


Print your own shirt – Screen printing made easy. In this post, I'll show you how to bring your own motif to a T-shirt from design to finished printing. Silft printing is a proven printing technique in which paint is painted on the textile by a fine-meshed sie - this creates rich, long-lasting colors and sharp edges. With pre-made screens or a simple foil template (instead of a photo emulsion), you can quickly and without a special lab to make your own shirts — ideal for individual pieces, small series or to try out with the ff logos.
About to get started?
Download the prepared SVG files with the ff-Site logo and start directly: adjust size, mirror (for slide template) and plot or print. Ideal for test prints, single pieces and small series.

Creating the screen
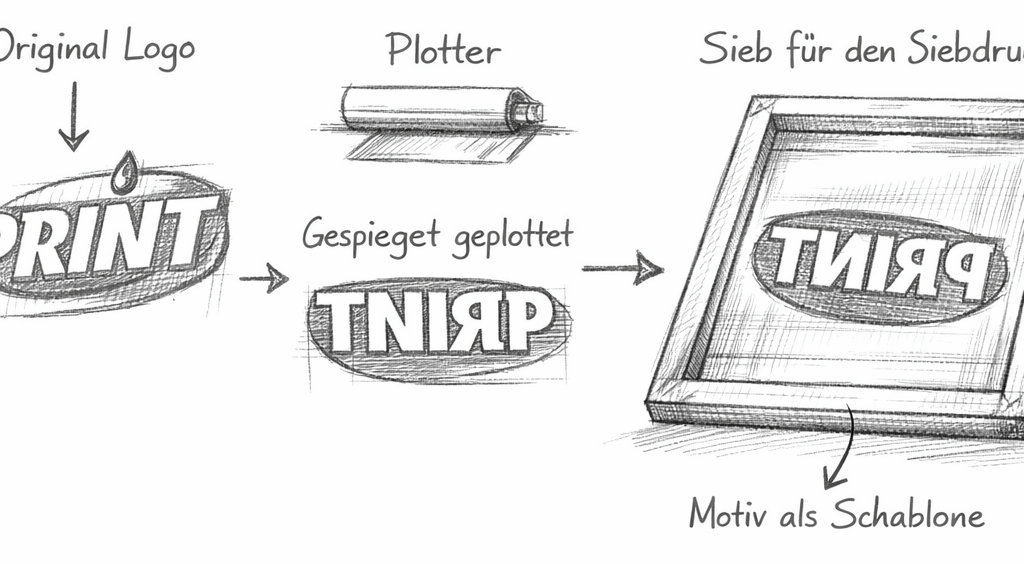
Starting from a logo as a vector graphic (SVG), the motif is scaled to the desired size and then mirrored. The file is cut on stencil foil with the plotter, the negative surfaces are de-grid and taken over with transfer tape so that even small islands can be safely placed. The foil comes on the LOWER side of the sie (textile side), is scratched without bubbles and the transfer tape is removed.
The stencil foil is then "flattened" with moderate heat (hair dryer or iron with protective lay) and again firmly scratched so that the edges close color-tight. Open areas on the Siebrand are taped off (parcel tape or painter's paper), a short test print checks the edges and coverage, then the shirt can be printed on and the color can be fixed according to the manufacturer's instructions.
Excursion: Vector vs. Pixel — why vector graphics
Vector graphics consist of lines, curves and shapes that are described mathematically, and are therefore arbitrarily scalable without loss of quality. This means razor-sharp edges and clean surfaces — perfect for logos and typographic elements.
Pixel images (raster graphics), on the other hand, are composed of individual pixels and have a fixed resolution; when enlarged, they become blurred or "pixelated", which is why they are better suited for photos and complex color gradients.
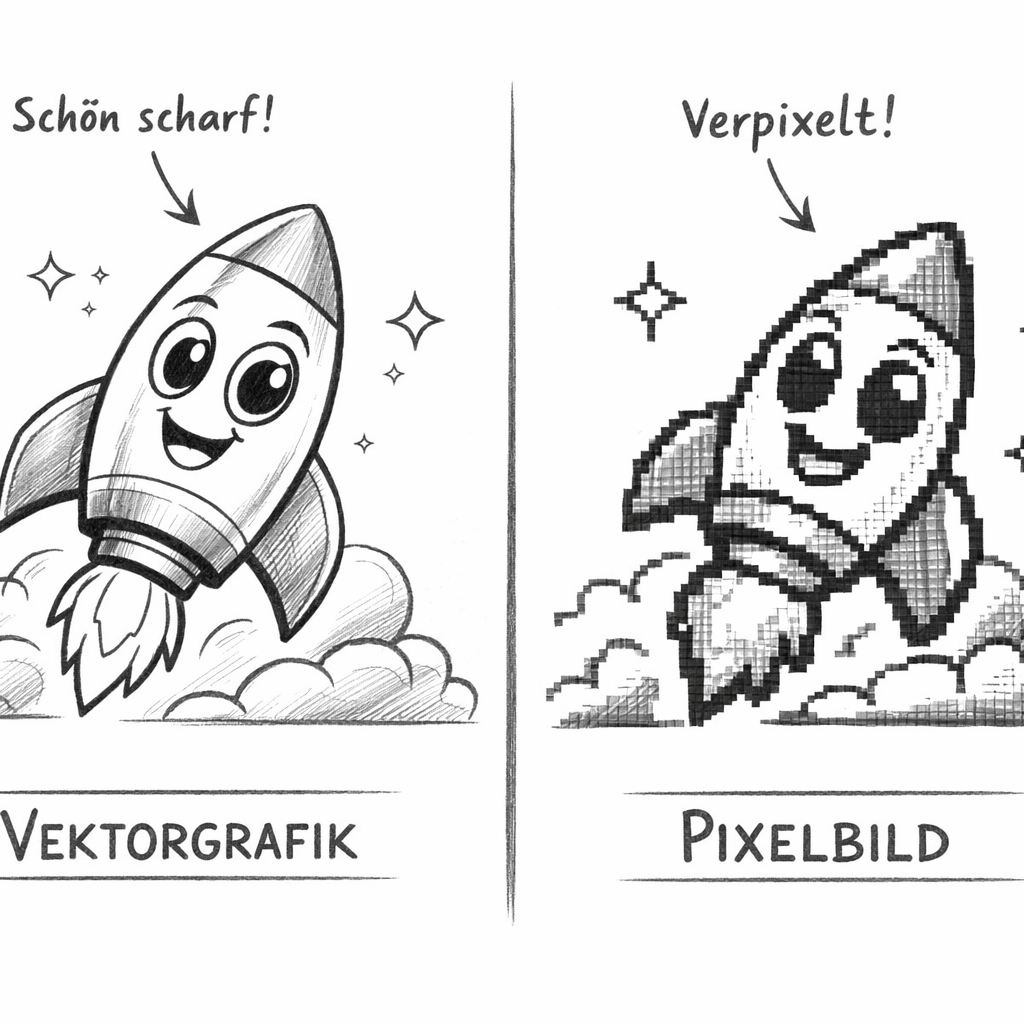
For silver printing, we prefer vector graphics (e.g. SVG) because they can be adjusted exactly to any desired print size, provide clear contours for stencils and make the creation of monochrome motifs or separate color excerpts much easier.
Screen printing: process in two phases
The printing process can practically be divided into two clear phases. First, the screen is flooded: without pressure, the sie is slowly pulled over the motif with the squeegee, so that the paint fills the open surfaces evenly. This ensures that all parts of the motif are completely wet and prevents air inclusions.
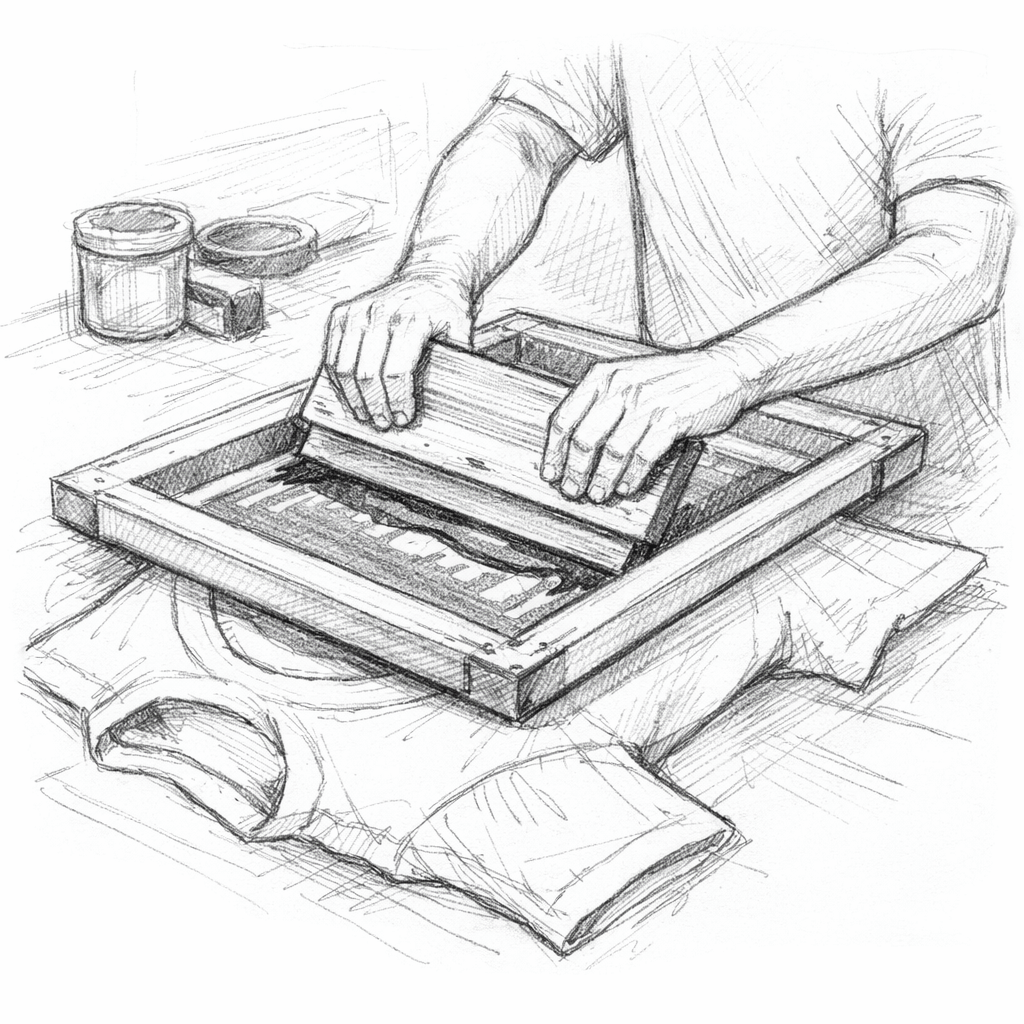
This is followed by the actual printing: the squeegee is attached again and now pulled over the sieve with pressure at an angle of about 45°. The paint is pressed onto the textile by the fabric.
At the end of the drawing, you pick up the excess paint directly with the squeegee (retract the squeegee or collect it at the sieve), so the edge remains clean and the sieve is ready for the next printing cycle.
Tip
Smooth the T-shirt before printing. A wrinkle-free, dry surface ensures clean edges, even paint application and prevents paint from "bleeding" in wrinkles. It is best to use a solid base and, if necessary, a cardboard insert.
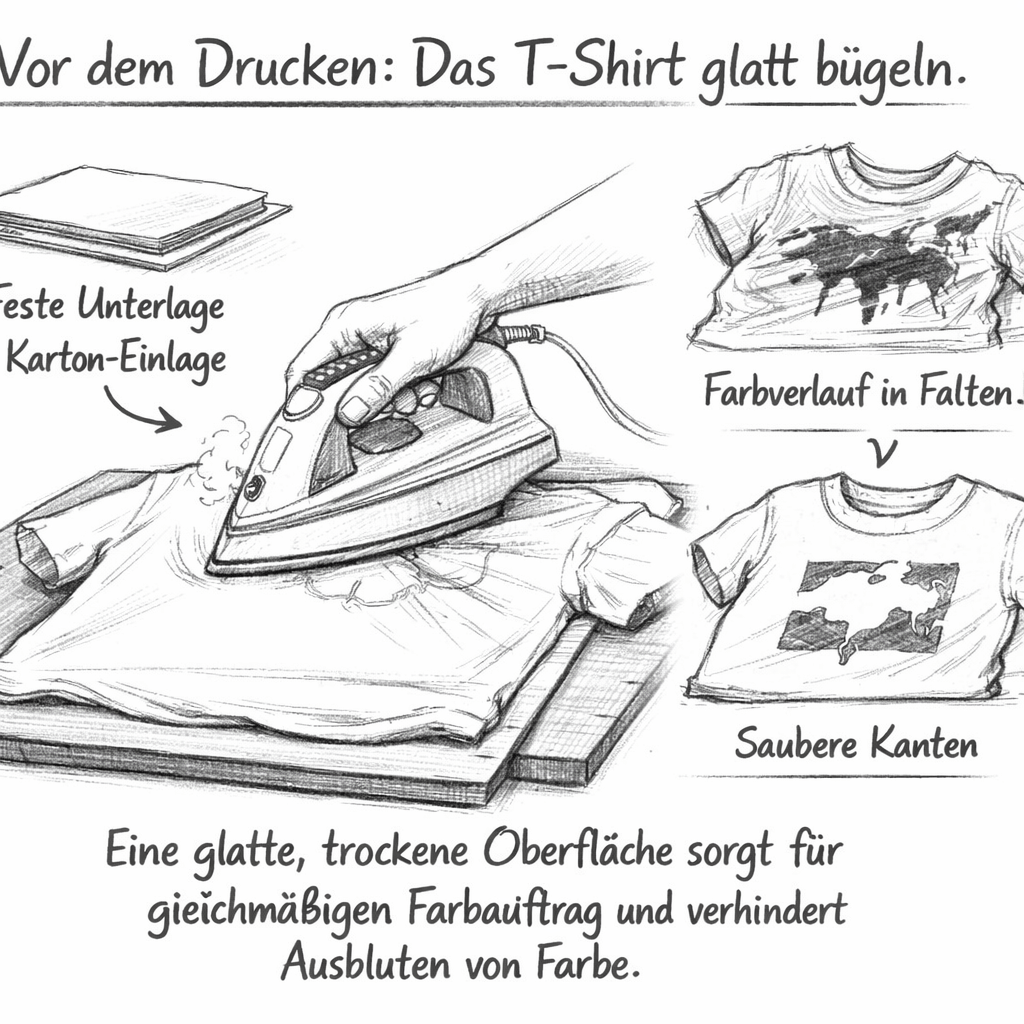
After printing, remove excess paint with the squeegee and rinse the sieve, squeegee and tools immediately with lukewarm water. Let everything dry and remove adhesive tapes if necessary while they are still wet.
Fixing the textile dye
In order for the silve print to become washable, the paint must be fixed after drying - always observe the instructions of the paint manufacturer. Two methods are common:
With the iron, dry the print completely, cover it with baking paper or Teflon foil and iron at about 150-170 °C for 2–5 minutes per area, evenly and with light pressure.
Alternatively, a hot press works: typically at 150–165 °C for 20–60 seconds under medium pressure, also with a separating layer.
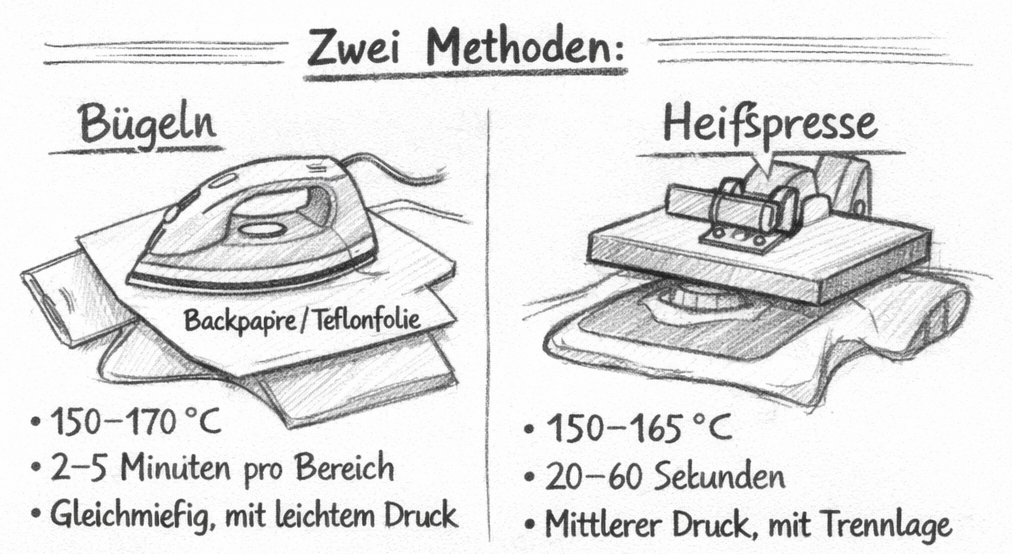
If in doubt, wait 24 hours before fixing, if the manufacturer does not make other specifications, and avoid fixing too long or too hot - better twice briefly than once too intense. After fixing, the first wash is recommended after 24-48 hours, turned to the wrong side and gently at low temperature to increase the durability of the pressure.
Screen printing versus iron foil
With the plotter you can cut ironing foils in addition to templates for the screen.
Screen printing scores especially with small series: If the template has been created, several shirts can be printed quickly, evenly and cost-effectively. The color is thin in the fabric, is robust and washable, and repetitions go quickly. In addition, rasters can also be used to print larger areas without the motif "gluing".
Iron-on foil (heat transfer vinyl) is particularly suitable for individual pieces: The effort per motif is comparable to the creation of the sieve stencil, for which you get exclusive effects and colors such as metallic, hologram, neon or flock with a tangible structure. The edges are very clean, the result is immediately usable, and corrections to the design succeed quickly, because you only have to re-plot.
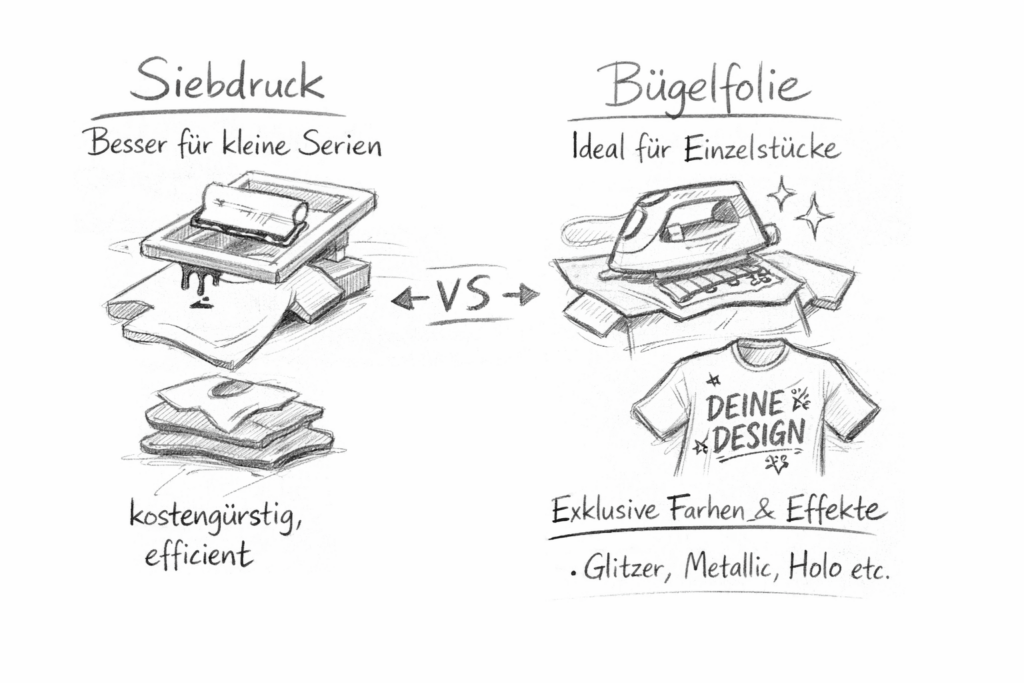
Conclusion: For several shirts in a short time, screen printing is usually the cheaper and faster choice, while iron-on foil convinces with special colors and surfaces and is ideal for individual pieces.
Leave a Reply